By: SkyeSage & MelodyVox - v1.1.01-26.11.11
● ● ●
2.0 Base Station Firmware & Laser Recovery
This is documentation on how to (hopefully) fix your 2.0 base station if it has corrupted firmware or a mildly broken laser. These can happen for a variety of reasons; an interrupted update, power outage, writing faulty 3rd-party firmware files, accidental drops, etc.This should be a last resort. Do not do this unless you have exhausted the option of speaking with the support team of your base station's manufacturer. This is a very dangerous thing to do, and comes with an inherit risk of permanently bricking your base station. This guide will delve into sending DFU packets and modifying EEPROM values, as well as modifying internal laser calibration values, all of which have a high likelihood of bricking your device without following these steps to the letter. We are not responsible if your base station cannot be recovered.There is no guarantee this will work, and may further brick your base station. You have been warned.
Table of Contents
Requirements
Credits
MelodyVox for reverse-engineering the base station enough to perform these recovery steps
The LighthouseRedox repo
The Steam Support Team
our caffeine addictions
Step 1: Set Up
In order to even be able to recover the firmware, we need to ensure SteamVR will give us a known good firmware update. To do this, we will set SteamVR's version to previous.Click the gear icon to the right of the Launch button, then click Properties, then Game Versions & Betas, then select previous.Let Steam download this branch.Next, you need to connect your Vive/Vive Pro/Index headset to your PC, or your 3rd-party dongle if you don't have any of these headsets. This is required for this update to be available within SteamVR at all. This will work if your headset no longer connects to your GPU. If done correctly, your SteamVR should be able to pull up the Base Station Settings menu found by right clicking on the SteamVR window.Regardless of your Bluetooth dongle working, you should launch OVR Lighthouse Manager to ensure your base station(s) appear in the software.This guide will not go over how to enable this menu if it's not appearing despite having a valid headset or 3rd party adapter connected.
Step 2: Locating Internal SteamVR Files
SteamVR comes with a set of files needed for it to quickly fire up your base stations and perform basic firmware updates from the factory, and Steam stores some of these files separately. These files can be easily found if you know where to look within Steam's file structure. We need to locate the following two files:- lighthousedb.json
- lighthouse_tx_vader_radio_full_dfu.v2_9_2004771.zipThese files are located in the following locations:- X:/PathToSteam/config/lighthouse/
- X:/PathToSteamGames/steamapps/common/SteamVR/tools/lighthouse/firmware/lighthouse_tx_vader/archive/428/You will need to find where you installed Steam on your own, as well as where you installed SteamVR.Copy the two files specified earlier and paste them into a safe location on your PC.Next, send the lighthouse_tx_vader .zip file to your phone. We recommend sending it over either Discord or email, then downloading the attachment from there.
Step 3: Sending the DFU Package
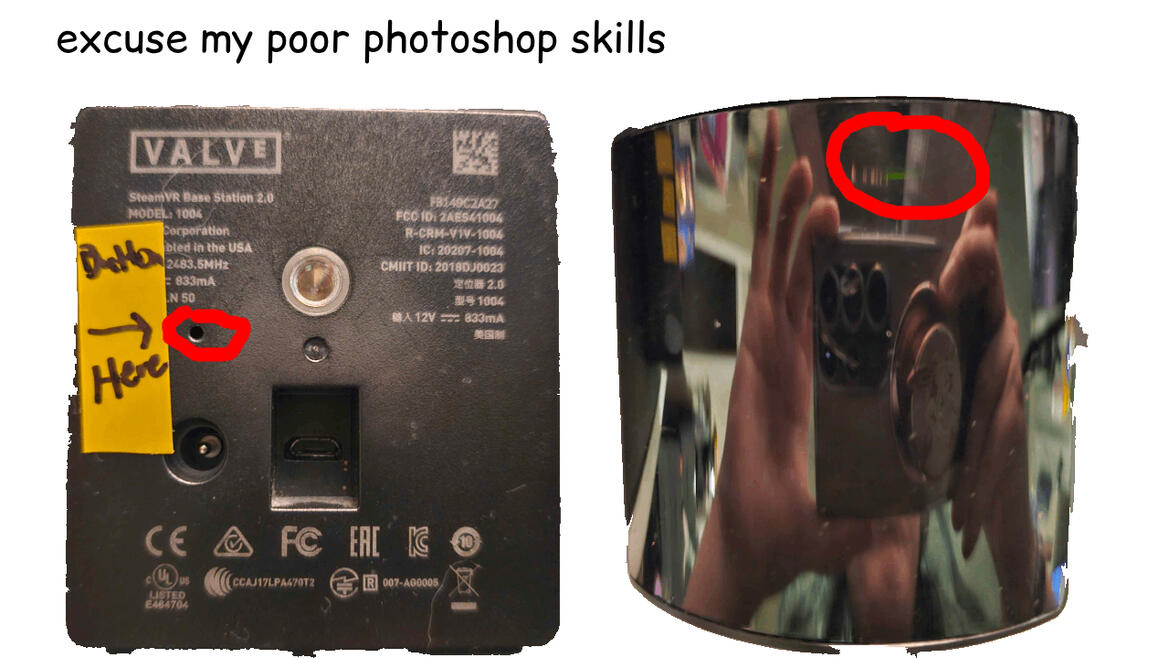
First, we need to boot the base station into recovery mode. To do this, we need to stick our thin wire into the small hole on the back of the base station. Press and hold the button at the very back of it while you plug in the base station. If done correctly, the base station's main light will be off, but a small green light will be visible all the way in the back of the unit. Here's a visual example:
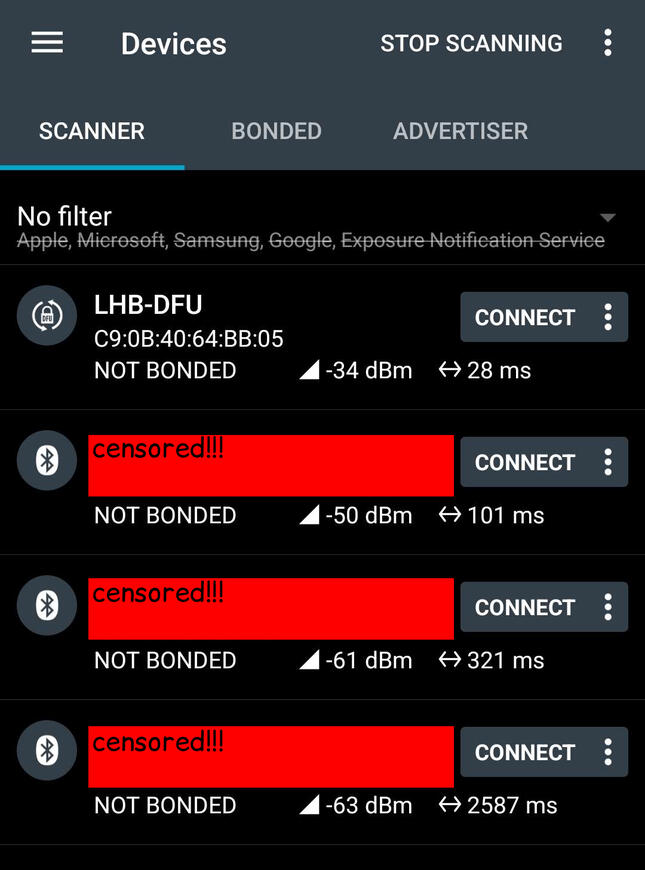
Next, open nRF Connect on your phone and skip through the tutorial. Once you're done with that. click the SCAN button in the top right corner and locate a Bluetooth device labeled LHB-DFU. Your screen should look like this:
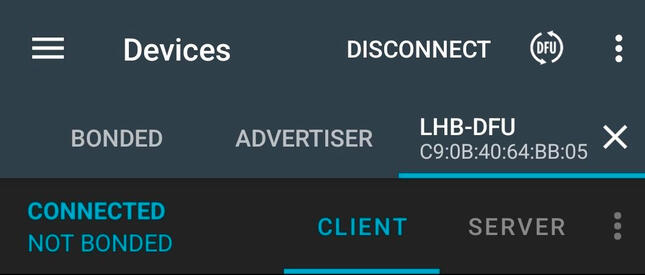
Click the CONNECT button, then the small DFU icon in the top right corner of the screen:
Next, a dialogue window will pop up. Click on the Distribution packet (ZIP) option, then navigate to where you downloaded the lighthouse_tx_vader .zip file from earlier.From here, your phone will start sending the .zip file to your base station. The app may disconnect the file transfer multiple times, so keep on pressing the DFU button and sending the .zip file until it reaches 100% and the app tells you the transfer is complete.Once this is done, disconnect your base station from its power adapter.
Step 4: Recalibrating the Base Station
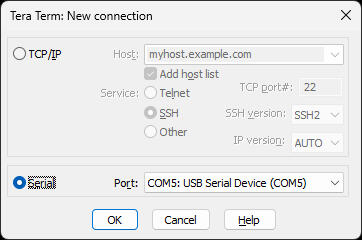
This is where things get tricky.Plug your base station into its power adapter (do not press the small button with your wire), then plug the microUSB cable into both your base station and your PC. You should hear the USB connect sound on your Windows PC.Next, open Tera Term. You'll see a couple of options immediately. Click on Serial, then click OK. The dropdown should auto-populate if the base station connects successfully. It should look something like this:
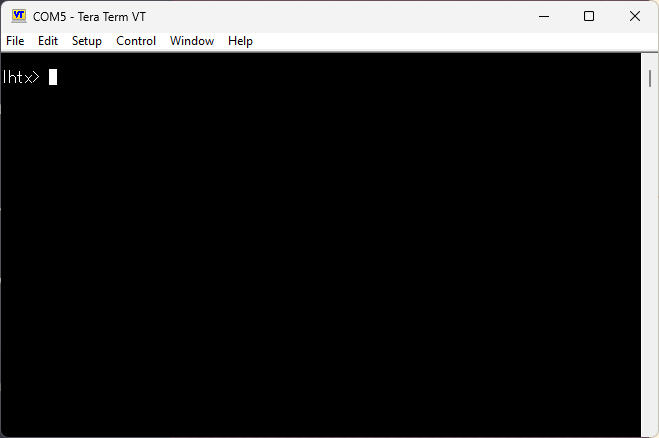
You should now (hopefully) see a bunch of text outputting to the Tera Term console window. If this is the case, enter this command: param default-allIf you aren't seeing a wall of text spam, just press enter.If you're successfully connected, you should see the following on your screen. If you don't, power cycle your base station until it does:
From here, we need to acquire the base station's internal serial number. This number is different than the serial number on the back of the unit. To do this, we're going to enter this command: idIt should spit out a bunch of information about the unit. All we need is the Serial Number field, so make a note of that specific value.Note that this value is in hexadecimal. Go ahead and convert this value to decimal. The example serial number we'll be using for this tutorial is 5AD708AA in hex and 1524041898 in decimal.Once you have the decimal value, open up lighthousedb.json in your text editor of choice. For this tutorial, we used Notepad. Press Ctrl + F, then type in the following string: "serialNumber" : SERIALHERE.Replace SERIALHERE with your converted serial number. Press enter. It should take you to where the configuration values for this unit are located, which should look something like this:
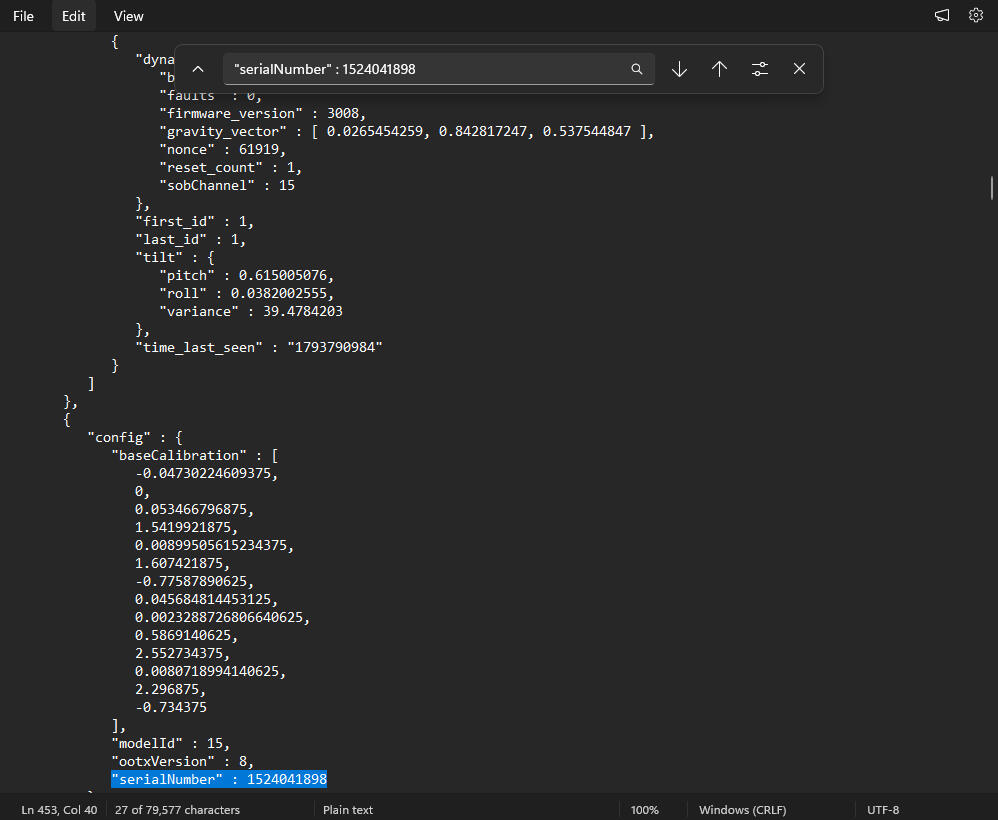
Make note of the values listed in the "baseCalibration" field. We'll be needing these.Next, go back to Tera Term and enter this command: param listThis will spit out a bunch of text. Store the output of this command in a safe place, it may come in handy for further repairs. For the sake of this tutorial, all we care about are the values labeled fcal. These values directly correspond to the "baseCalibration" numbers we found earlier. Make sure these numbers match rounded to the 6th decimal place.If any of these numbers don't match the numbers we got from lighthousedb.json, we're going to have to manually write them. To do this, we're going to enter the following commands. Replace X.XXX with the number found in your lighthousedb.json file:param set fcal.0.tilt X.XXX
param set fcal.0.phase X.XXX
param set fcal.0.curve X.XXX
param set fcal.0.gibphase X.XXX
param set fcal.0.gibmag X.XXX
param set fcal.0.ogeephase X.XXX
param set fcal.0.ogeemag x.XXX
param set fcal.1.tilt X.XXX
param set fcal.1.phase X.XXX
param set fcal.1.curve X.XXX
param set fcal.1.gibphase X.XXX
param set fcal.1.gibmag X.XXX
param set fcal.1.ogeephase X.XXX
param set fcal.1.ogeemag X.XXXOnce you have ran the above commands, run this command to save these values: param saveOnce the command has been run, unplug your base station from both the power adapter and the microUSB cable.
Step 5: Update Recovery
This is where everything should come together and fix your base station.Plug your base station into its power adapter, then open SteamVR with your Vive/Vive Pro/Index headset or 3rd-party adapter connected. Once SteamVR is open, go to the Base Station Settings window and click on Recover From Incomplete Update. If everything worked correctly, you should see your base station pop up. Go ahead and proceed with the update recovery from there.Once the update is complete, you should (hopefully) be able to use your base station again, exactly as it was before the firmware got corrupted.Don't forget to re-assign your radio channels! All of your base stations will use channel 1 by default, so if your tracking is still broken, make sure that's fixed before moving onto the next step.
Bonus Step: Laser Recovery
Sometimes, people accidentally drop their base stations, which may suddenly cause it to display the Red Light Of Death™. This is because internal parts of the laser get jostled around when dropped, causing the internal calibration values set in the factory to no longer be accurate. In some cases, the laser isn't actually dead.Other times, people may follow this blog post by @0kq in an attempt to fix their base station. While this blog post may work in some very specific cases, its documentation is very incomplete, and may result in the base station suddenly displaying the Red Light Of Death™ upon completing Step 5. We do not recommend following this guide due to its incomplete information. The laser isn't actually dead; it's just reading incorrect calibration values that are causing it to freak out.This step is incredibly dangerous, as we are messing with the internal laser's calibration values. There is no guarantee this will work, and may permanently brick your base station. It is impossible to measure the laser output without specialized equipment, and all of the steps listed below are educated guesses. Additionally, this will affect your tracking quality in a potentially negative way. Only do this as a final resort if the above steps do not work. You have been warned.
First, we need to ensure the base station is actually reporting a laser fault. Run the following command to make sure: journal faults. If the base station is reporting a fault-laser-dead error, then these instructions will (hopefully) bring your base station back to life.Next, we're going to do the incredibly risky thing of running through the factory's laser calibration commands. This is normally only possible to measure with specialized equipment, but there is a sweet spot of educated guesses that may recover the base station into a functional state. Next, run this command: factory laser-calThis will spit out a bunch of values, then leave you with a prompt. We're interested in this value right above the text prompt: current XXX, reported XX.X. If the reported XX.X value is not above 10, enter 0 into the text prompt and run the initial command again. Once it's reporting a high value, enter a value between 100 and 180. For the base stations we recovered while writing this documentation, we entered 120 due to how old they were and how long they had been running. For base stations older than 2 years, you may need to reduce this number. No matter what, don't go below 100.Sometimes, the console may report ERROR: Invalid sensed values?!. Just run the calibration command again until it works.If you are successful, your console should look something like this:
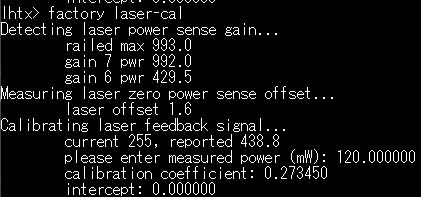
Once your entered number doesn't report any errors, enter factory save-cal, then param save. This will save the configuration we just performed into the base station's RAM, then directly into the respective EEPROM partition.From here, you can turn off your base station within OVR Lighhouse Manager (with SteamVR running), then turn it back on. If our educated guess is correct, your base station will now be running good as new without any Red Light Of Death™ jumpscares!There's now no need for our SteamVR install to be on the previous branch. You can now reset it back to whichever branch it was originally on.Don't forget to re-assign your radio channels!
🥳🎉Recovery Complete🎉🥳
Your base station should (hopefully) be good as new! If not, then we offer our condolences...If you find any inconsistencies with this guide or would like to contribute more information, please notify @skyejudeshaw.bsky.social on Bluesky or @SkyeJudeShaw on Twitter. You can also reach out to @skyesage or @gamingframe on Discord.Cheers!